Muddy or Just Quiet? Find What Is Hiding Your AI Vocal
A listening-first route through low-mid masking, restrained EQ, mono bass, and the point where a stereo file needs stem-level control.

The singer sounds as if they are performing from the next room. You can hear a voice, yet the words disappear behind bass, piano, guitars, and wide pads. Turn the vocal up and the track gets louder, not clearer.
That distinction matters. A quiet vocal needs a balance move. A masked vocal is already present, but nearby sounds cover the frequencies that carry its body and intelligibility. Raising the fader lifts the collision with it. The result can become pushy in the upper mids while the lower part of each word remains buried.
Those numbers are starting points, not a diagnosis made by a spectrum display. Save an untouched version, loop the busiest vocal passage, and listen at a moderate level. If you cannot name the element covering the vocal, begin with the broader audio triage guide before adding another processor.
01 / Hear the overlap
The 200–450 Hz Collision: Where AI Stacks Too Much Energy
Auditory masking happens when one sound makes another harder to hear because their energy overlaps. In a dense arrangement, a sustained pad around 300 Hz can cover the lower body of a vocal even when the vocal meter looks healthy. The brain receives both sounds, but it cannot separate their shapes easily.
AI-generated arrangements can arrive with several full-range parts already blended together. Bass harmonics, the left hand of a piano, low guitar notes, synth chords, kick resonance, reverb, and the singer’s fundamental may all occupy the center at once. That does not prove anything about how a closed model works. It describes what you can hear and test in the exported file.
Warmth and mud are not synonyms. Warmth gives a voice or instrument useful weight and intimacy. Mud removes boundaries: notes smear together, the kick loses definition, and words become difficult to follow. If a small cut makes every part feel thin, you were probably removing warmth. If it reveals the vocal while the track still feels grounded, you reduced masking.
Run a simple balance check before EQ. If you have separate vocal and backing tracks, lower the instrumental bus by 2 dB without changing the vocal. If clarity returns across the whole phrase, rebalance first. If certain vowels vanish only when one pad, guitar, or piano part enters, that is a better target for dynamic control. With only a stereo file, first compare a sparse vocal phrase with a crowded one; lowering the whole mix cannot isolate a vocal-to-backing balance problem.
02 / Clear the center
The 200–450 Hz Energy Balance Checklist
Work from the bottom upward and change one condition at a time. The checklist protects the mix from a common overreaction: cutting the entire low-mid range because one instrument is too dense. Keep the original beside the edit and bypass after every step.
| Action | Tool | Starting point | Pass condition |
|---|---|---|---|
| Remove subsonic buildup | 12 dB/oct high-pass filter | 30–35 Hz on the master | Headroom improves without weakening kick or bass |
| Test the boxy area | Wide bell EQ | About 320 Hz, Q 1.8, −2 dB | Words move forward while the mix keeps its weight |
| Focus the low end | Mono-bass utility | Inspect below 100 Hz | Bass stays centered and does not smear in mono |
| Check translation | Phone speaker at a safe level | Busy verse and chorus | The vocal reads without strain or extra volume |
Do not high-pass a master above 50 Hz as a generic cleanup move. That can remove useful fundamentals and make the track feel smaller while the masking remains. Likewise, 320 Hz is a test area, not a magic frequency. Move the band slowly and listen for the exact point where the vocal gains separation.
After the phone check, return to your main headphones or monitors. Small speakers can hide deep bass and exaggerate the apparent success of a cut. The change passes only when it helps on both systems and still works after the processed version is matched to the original’s loudness. Use the level-matched before-and-after listening comparison, then check that the snare and the lower notes of the vocal still have support.
03 / Make room briefly
Unmasking Without Thinning: The Dynamic EQ Route
A static EQ cut removes the same amount during vocals and instrumental breaks. A dynamic EQ reduces a selected range only when its detector crosses a threshold. Used on the instrumental bus, it can create a small pocket while the singer is active, then restore the body of the arrangement between phrases.
On the masking instrument or instrumental bus, start with a broad band between 250 and 400 Hz. Set the maximum reduction around 1.5–2.5 dB and use a moderate attack so the backing does not duck abruptly. Release should follow the phrase naturally: too fast can chatter, while too slow leaves the next instrumental moment hollow. If sidechain input is available, feed the vocal into the detector so the cut responds to the performance rather than the backing’s level alone.
Listen in the full mix, not with the EQ band soloed for more than a few seconds. Solo helps locate energy, but the decision belongs in context. Toggle the processor off and on at matched loudness. Keep it only if the words are easier to follow and the instrumental tone remains convincing.
Stop condition
If the vocal needs more than about 3 dB of low-mid space across the entire song, check balance, arrangement density, and stem quality. A deeper hole may make the backing sound hollow without solving a weak or damaged vocal.
04 / Choose the source
Stereo Mix Fix vs. Stem Multitrack Fix
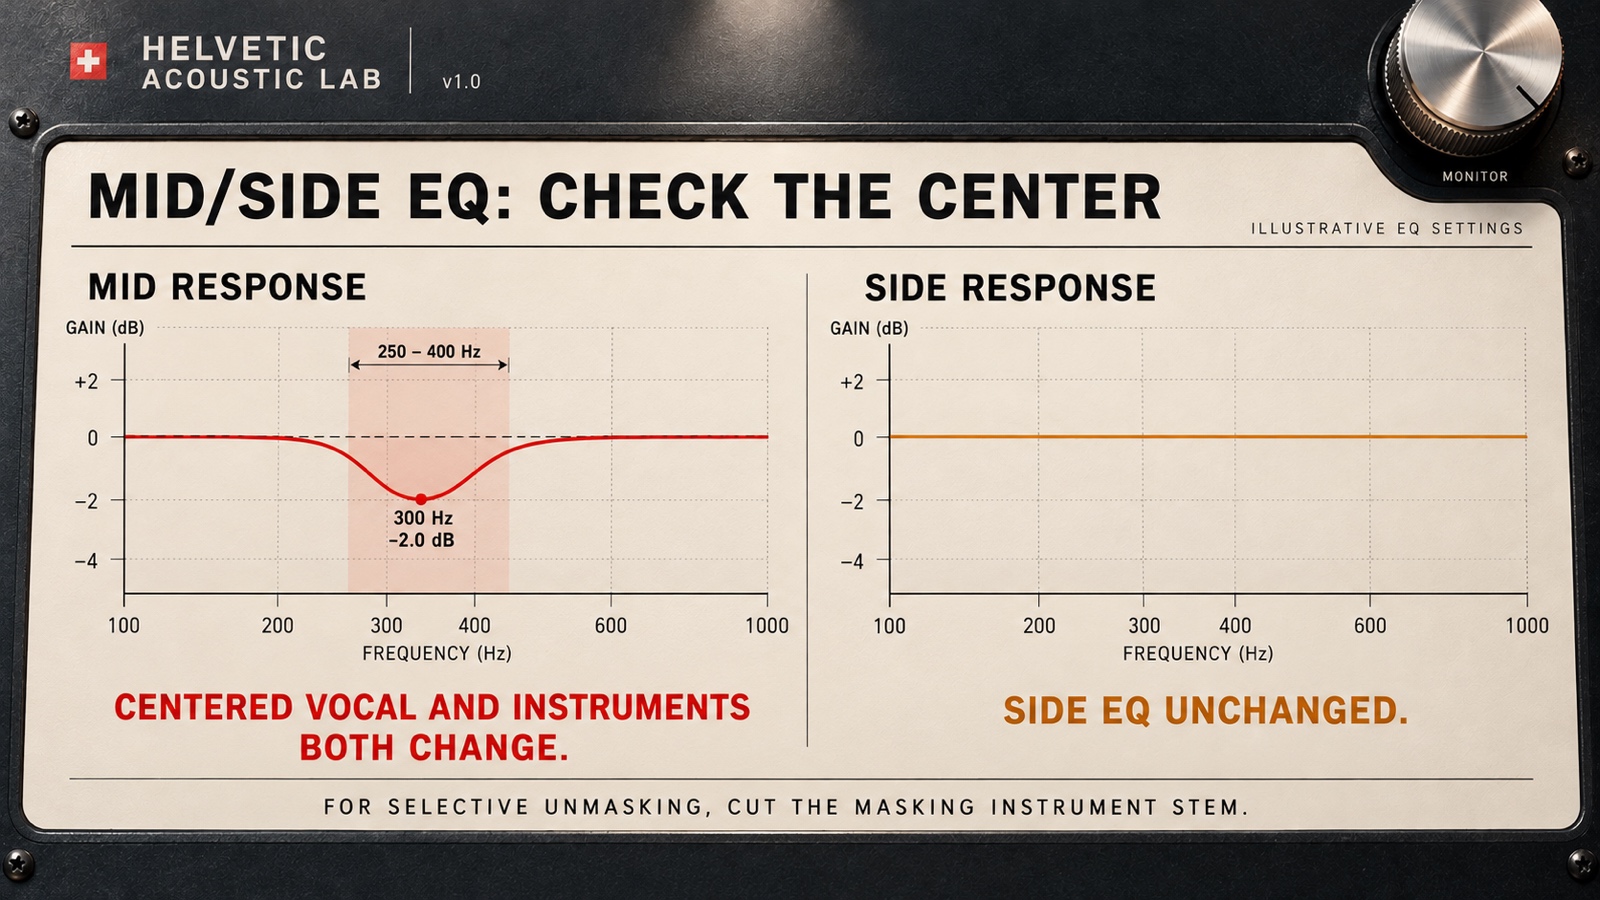
With only a stereo export, every EQ move touches multiple elements. Mid is a sum of the left and right channels; Side carries their difference. Neither is an isolated instrument stem. You can audition a 1.5–2.5 dB Mid cut between 250 and 400 Hz while leaving the Side EQ flat, but the centered vocal is attenuated too. Keep the move only if the whole balance improves without hollowing the vocal, kick, bass, or snare. Pro-Q’s stereo placement controls let you apply a band to Mid or Side separately.
Stems provide a cleaner target when one pad, piano, guitar, or bass part is clearly responsible. Place the dynamic cut on that part, trigger it from the vocal, and leave unrelated instruments alone. Stems are not automatically better, though. Separation can introduce vocal bleed, phasey edges, and smeared transients. Compare each stem against the original stereo export before building a longer chain.
For a Suno stereo export, follow the four-stage Suno export repair plan; lower-mid cleanup comes after de-shimmering so you can judge each change on its own.
Choose stereo processing when the problem is mild and broad, the source is cohesive, and a 1–2 dB move solves it. Choose stems when the collision is traceable to one part and the separated files sound clean enough to use. Run the stems-or-stereo decision matrix before committing; if neither route restores intelligibility without obvious damage, regenerate or rearrange the section rather than carving a permanent hole through the mix.
05 / FAQ
Frequently Asked Questions
Why does cutting 300 Hz make my AI track sound weak?
The cut is probably too deep, too wide, or applied to the entire mix when only one element is crowding the vocal. Restore the baseline, reduce the cut to about 1.5–2 dB, and narrow the range. Bypass often and stop as soon as the words become easier to follow.
Can I fix a muddy mix using an AI mastering tool?
Mastering is not the first fix for masking. A limiter can make a crowded low-mid range feel denser because it controls level without separating the competing parts. Resolve the masking before the mastering stage, then compare the result at matched loudness.
How can I tell if the vocal is quiet or just masked?
If you have separate vocal and backing tracks, lower the backing by 2 dB for one pass. If the whole vocal becomes naturally clearer, the balance may be the problem. If the vocal is already loud but its vowels and words blur whenever bass, piano, or pads enter, low-mid masking is more likely.
Your next move
Lower the collision, not the life of the track.
Save the raw export, loop the busiest vocal phrase, and try one small change. If the vocal becomes readable while the bass and arrangement keep their weight, stop. Clarity is the result of separation, not the number of plugins in the chain.
Run the checklist