What Did the Cleaner Actually Remove? A Delta-Listening and Null-Test Guide for AI Audio
The hiss gets quieter, and the chorus seems cleaner. Then you notice the snare has lost its snap. Listening only to the finished mix can hide that trade-off because the disappearing noise takes your attention with it.
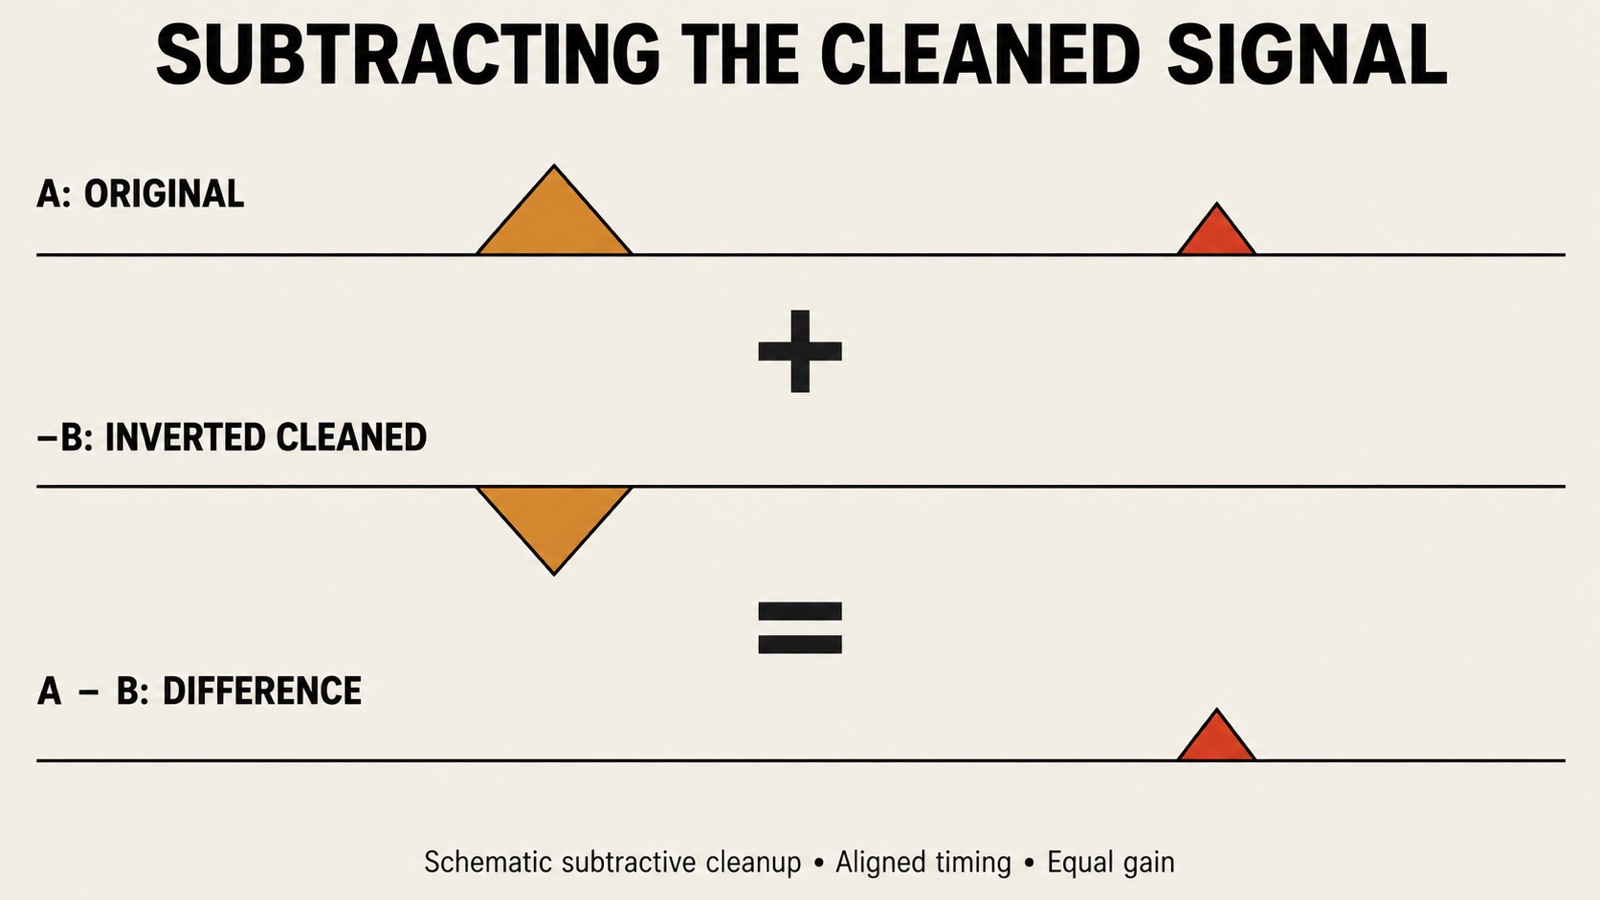
A difference signal turns the question around: what changed between the two versions? For simple subtraction, D = A − B, where A is the original and B is the processed audio. If B adds something, the difference includes an inverted version of that addition. It cannot label a sound as useful music or unwanted noise for you.
Keep the blind level-matched comparison protocol as the final listening test. Use this guide to investigate changes inside the five-test audio cleaner audition, rather than treating the loudest residual as the worst processor.
01 / Choose the monitor
Built-In Delta Buttons vs. Manual DAW Null Tests
1. Using the Plugin’s Internal Delta / Noise-Only Switch
Look for a documented control called Delta, Difference, or Output Noise Only. iZotope describes Output Noise Only as monitoring the difference between original and processed signals. Loop the troublesome phrase, engage that mode, and listen while reducing the amount of suppression. Turn the mode off before judging the cleaned version.
Read what the button actually monitors. A headphone icon can mean a filtered band or detector input. Pro-Q's band solo helps locate a frequency region; band solo is not a full input-minus-output Delta. Likewise, a sidechain audition can tell you what triggers a processor without showing exactly what it removed.
An internal monitor avoids manually lining up exported files, but its meaning still depends on the processor's implementation. If the manual only says “listen to the selected band,” use it to find the problem area, then return to normal playback. Do not interpret every audible vowel there as a damaged vowel.
2. Setting Up a Manual 2-Track Polarity Null Test in Any DAW
For a web-service export or a processor without a difference monitor, subtract the files in your DAW. Audacity's Invert documentation explains the basic cancellation: invert one copy and mix it with identical audio. Polarity inversion multiplies sample values by −1; it is not a time shift or a repair for left/right phase problems.
Prepare two copies and verify the routing
Keep the untouched export on Track A and import the cleaned version on Track B. Use the same sample rate and stereo channel layout, disable automatic warping and normalization, and bypass other inserts and sends. Route both tracks once to the same clean bus.
Align the audio at sample resolution
Zoom to individual samples and align a sharp transient near the start. Check another transient near the end of the loop. A single offset cannot fix timing that drifts across the passage.
Remove any known constant gain change
Disable automatic makeup gain when possible. If processing added a known constant gain, undo it with a constant trim on Track B. Start both faders at unity and keep pan, channel mapping, and automation identical.
Invert polarity and sum both tracks
Invert the polarity of both channels on Track B, then play A and B together through the clean bus. Lower monitoring level before starting. Check the setup first with two untouched copies: they should cancel.
Listen to the residual, then return to the song
Note whether the residual contains the target defect, wanted music, or a broad copy of the mix. Return monitoring gain to normal, disable polarity inversion, and compare one version at a time at matched loudness before deciding what to keep.
If the untouched-copy control does not cancel, fix the setup before testing the cleaner. Check hidden sends, pan laws, channel swaps, fades, and bus inserts. A near-silent bus can tempt you to turn the monitors up; restore their normal level before soloing either complete track.
02 / Interpret cautiously
What You Should (and Should Not) Hear in the Difference Signal
These are listening prompts, not automatic pass/fail measurements. The frequency ranges are starting places to investigate; a singer's sibilance or a cymbal's shimmer may sit elsewhere. “Music in the residual” becomes a reason to back off when the cleaned version also loses detail you wanted to keep.
| Cleanup stage | Expected target in the residual | Reason to inspect or back off | Next listening guide |
|---|---|---|---|
| De-shimmer; investigate around 10–14 kHz | The distracting glassy ring at note endings | Hi-hat attacks and useful vocal air disappear from the cleaned mix | Hiss vs. metallic shimmer |
| De-essing; investigate around 6.5–8.5 kHz | Brief bursts of excessive S, T, or CH friction | Whole vowel tones or snare body change; wideband de-essing can include more than the selected high band | The S-sound vocal test |
| Low-mid reduction; investigate around 200–450 Hz | The part of a pad or chord that masks the vocal | The lead loses chest or the kick loses weight in the full mix; some tonal material in an EQ residual is expected | Muddy AI mix unmasking |
| Broadband denoising | Steady hiss, or a hum the processor is configured to target | Recognizable melody, guitar plucks, reverb tails, or a drum groove become weaker in the cleaned version | Identify the noise before removing it |
Do not call a residual clean just because it sounds like noise. The RX Spectral De-noise manual notes that stronger suppression can degrade low-level detail. Compare quiet tails and consonants as well as the loud chorus. If less reduction restores musical detail while leaving the defect tolerable, keep the smaller move.
03 / Check the test
Three Traps That Ruin a Null Test (and How to Avoid Them)
Trap 1: Sub-Sample or Codec Timing Drift
A fixed delay leaves a time-shifted copy in the subtraction. For a sinusoid, the residual magnitude depends on frequency: 2|sin(πfΔt)| times the original amplitude. That is why even a one-sample offset can leave a bright residual. You are hearing a timing difference, not necessarily detail removed by a denoiser.
Ableton's delay-compensation FAQ describes how the host aligns paths with different plugin latencies. Check that feature in your DAW, then inspect the actual rendered files. Host compensation does not establish that a downloaded service export starts at the same sample.
Align an unchanged sharp hit and check another later in the passage. If no single offset works, resampling, time stretching, or lossy encoding may have changed more than the start time. Integer-sample nudges cannot perfectly undo a fractional-sample shift. Prefer equal-rate lossless files and stop using the residual as a damage verdict when the timing cannot be reconciled.
Trap 2: Unmatched Gain Before Polarity Inversion
If B is simply A multiplied by a gain g, subtraction leaves (1 − g)A: a quieter copy of the whole song. A constant +1.5 dB boost corresponds to about 1.189 times the amplitude, leaving a residual about 14.5 dB below the original. That number is relative to the source, not an absolute dBFS reading.
Undo a known constant gain change before subtracting. Integrated LUFS matching is useful for a fair A/B, but it does not guarantee sample-amplitude cancellation. Compression, limiting, and automatic gain that moves over time cannot be undone with one trim. When those are part of the service, describe the residual as the total processing difference.
Trap 3: Minimum-Phase EQ Phase Rotation
Ordinary minimum-phase EQ changes phase as well as level around its filters. An external null therefore includes both effects. The Pro-Q processing-mode documentation explains the phase behavior and the latency and pre-ringing trade-offs of linear-phase processing.
A built-in Delta does not automatically remove phase-related differences either. Band solo can help locate the region, but it answers a different question. Keep the processing mode you intend to use, note it in the log, and judge the repaired mix. Switching to linear phase changes the treatment; it is not a free correction to the test.
04 / Leave a usable record
Record Your Delta Verdict in a Reproducible Test Log
Save the excerpt timestamps, source filename and sample rate, tool version, processing mode, threshold, reduction amount, makeup gain, alignment offset, and monitoring method. Record whether you used true difference monitoring, a detector audition, or band solo. Those labels keep the next comparison honest.
Example log: chorus 00:42–00:54; original stereo WAV; one denoise stage; reduction lowered from 6 dB to 3 dB; no makeup gain; fixed timing offset checked at both ends. Residual: less vocal tail at the lighter setting. Full-mix A/B: hiss remains acceptable and the final word stays intact. Verdict: keep the lighter version.
This is an example entry, not a measured result. Use a repeatable track repair log for your own files. In the four-stage Suno repair workflow, compare each stage separately before inspecting the whole chain. Otherwise, the residual cannot tell you which processor changed the snare.
Save the original, the chosen processed file, and the settings together. If the residual raises a concern but the matched comparison reveals no useful improvement from changing the setting, stop chasing silence. The goal is a better song, not a trophy for the quietest subtraction bus.
05 / FAQ
Frequently Asked Questions
If two tracks do not null to complete silence, does that mean the plugin ruined the audio?
No. A residual shows a difference under the current alignment, gain, and routing. Perfect cancellation means the compared sample values match in that setup, not necessarily identical file bytes or metadata. Noise removal should leave a difference; so can dither, phase changes, or added harmonics. Judge whether the cleaned song keeps its useful detail.
Why does a saturation or tape plugin leave almost the whole song in a null test?
Saturation changes the waveform and adds harmonics. A tape model may also include noise or time modulation, depending on its settings. Those changes belong in the difference signal even when you like the result. Use a blind, level-matched A/B as the main quality decision; a large residual is not proof of damage.
Can I use a null test to check whether a WAV download from an AI generator is really a transcoded MP3?
Not from one WAV alone. A null test needs a reference, ideally the exact same generation before any suspected encoding. A high-frequency cutoff does not prove an MP3 history: filtering, source bandwidth, and synthesis can also remove high frequencies. Use a known reference and export provenance rather than a spectral cutoff as a verdict.
For the final preference check, return to the blind level-matched comparison protocol.